The Three Chair Bench

In my wanderings on Pinterest, I have come across several examples of benches that people made out of dining chairs.  There have been a few that I really liked, and so, a few months ago, I decided to try my hand at making one.

I started off with 6 chairs that I had found in the alley.  Three were complete, and three had decorative pieces missing.  So, I used the three that were complete.

Image

I had originally planned on painting them white, and using them for our dining chairs, but had changed my mind.

Image

I kept two chairs intact, and took the front and side pieces off of the third.  I then glued the back piece to the center of the whole chairs, using gorilla glue and tape.  While this dried, I screwed three wood screws into each of the bottom, center legs.  Unfortunately, this was pre-blogging days, so I didn’t take a lot of photos during the process.

Image

I then cut down a scrap piece of the center chair to use as a brace for the center, front.  I attached this using L brackets on the inside of the bench.  I then cut pieces of plywood to make the new seat and attached arms that I salvaged from another chair.

Image

The wood was then covered with batting and upholstered with white fabric.  I didn’t like this look, so I made a slipcover out of a Ralph Lauren sheet.

Image

At this point, I got tired of working on the bench, and put it in our storage shed.  Fast forward to this weekend.  I got the bench out of storage and decided that it would look great as extra seating in our living room.  I didn’t want to use the slipcover on it (as I wanted something darker for the fall/winter season), so I made another one, using fabric from a pair of curtains that I had gotten at the thrift store.  I also painted the entire piece with white chalk paint, in order to give it the finished look.

Image

And here it is.

Image

And the back.  But of course, I couldn’t stop there, so I made new curtains to match.

Image

Keep creating!

Clif

Greg’s “New” Kitchen via Design on a Nickel

Have you ever seen the show on HGTV called Design on a Dime?  It’s where a group of 3 designers go into someone’s home and transform it with a budget of $1,000.

Well, when my best friend, Greg, asked me to help him redesign his kitchen, his budget, unfortunately wasn’t $1,000.  It was more like $100 (or less), so it was kind of like Design on a Nickel.  But he had seen the wonders that I can do when it comes to transforming useless crap gently used items and he figured that I would be up to the task…plus he knows that I work for cheap.

First up was the buffet.

Image

This was how it looked when I found it…in the alley…for free!  It’s a piece by Baker Furniture company, so it’s really solid, but it was missing a drawer and the decorative kick plate was damaged.  Even so, it was free, and one shouldn’t look a gift horse buffet in the mouth missing drawer hole. 😉

I forgot to take pictures during the transformation, but here is what we did.  We removed the damaged kick plate and added wooden feet that we got at Home Depot for $12 for 4.  Then we used a piece of plywood to finish out the opening and make it look like it was originally built that way.

Next up, we painted the entire piece with Behr Black Suede paint that I mixed up as a chalk paint.  1 gallon of paint $27.  And lastly, we added new drawer pulls that I had found a few months back…in the alley…and they were free.

So, where are we so far in our budget of $100 (or less)?  Buffet – FREE.  Wooden feet – $12.  Plywood – FREE.  Paint $27.  Drawer pulls – FREE.  Total $39!

Next up was the table.  (That’s Greg in the background thinking, “This don’t look like Pottery Barn furniture!”)

Image

…and chairs.

Image

I got the table and 6 matching chairs for the low, low price of (you guessed it) FREE!  My friend, Elisa, called me up a few months ago and told me that she knew a guy that was getting rid of the set and just wanted someone to come and haul it away.  I told her that I could do that.

It turns out that the suite belonged to the aunt of the guy’s ex wife and he didn’t want it anymore.  It had also survived Hurricane Katrina when it hit Mississippi, and it showed.

The seats were upholstered in a “lovely” gold crush velvet, circa 1970.  I think the fabric was a reject from one of the costumes that were made for the movie, Saturday Night Fever.  It was sturdy set, but it was tired, and in desperate need of a make-over…Clif Creations style!

Image

Everything got covered with two coats of Black Suede chalk paint, then two coats of wax, and then buffed to a light sheen.

Image

Our quality control supervisor, Holly, made sure that every step in the process was done to the highest standard.

Image

And every time that I would complain about how the paint was ruining my manicure, Holly would bark at me, “Quit your bitchin you big baby…beauty is pain, beauty is pain!”

Image

Holly even barked at Greg, “Make sure you cleaned those brushes right!  You know I hate dirty brushes in my workshop!”  Man, but she’s a hard ass. 😉

After the paint and wax had dried, it was time to tackle that hideous upholstery fabric.  6 pieces of foam and $4 worth of thrift store fabric later, and the set was complete.

Budget so far: Table and 6 chairs – FREE!  Wax – $5.  Foam – FREE!  Fabric $4.  So that brings our total up to a whopping $48!

We then moved all of the furniture upstairs and put it in place.  The buffet looks like this…

Image

Image

We took advantage of the missing drawer and used the space to hold a Longaberger basket that I got at the thrift store for $10.

Image

A close up of the new drawer pulls.

Image

The chairs…very French bistro.

Image

And all the furniture together.

Of course, I couldn’t stop there.  I also made new curtains, and a runner for the buffet, out of $8 worth of thrift store fabric.

Image

Image

Image

And then, to finish it all off, we added 3 original fruit paintings (2 of apples and 1 of a pear) that I found at the thrift store for $12 (I already had the frames, so they were FREE!).

Image

After all was said and done, Greg now has a beautiful “new” kitchen that only cost him $78…or 1,560 nickels! 🙂

Keep Creating!

Clif

If I Only Had (Another) Bench!

Have you ever found yourself thinking, “I wish I had a small bench, with a cushion on top and storage on the bottom”?

Today I was in our living room looking at a small bench that I already had.  There was nothing wrong with it.  It was structurally sound.  It matched our decor.  But I had had it awhile and was ready for a change.  I also wanted something with storage in the bottom so that I could stash away more of our crap prized possessions, that I’m not decorating with at the moment.

Well, you know me, if I need something I usually figure out a way to make it…and that’s just what I did.

Image

Isn’t it FABULOUS?!!!!

Ha!  Fooled you!  That’s the before shot. 🙂

I found this piece the other day and had to lug it home in the back of my Civic (you’d be amazed what all I can cram into that little car.  It’s like Hermione’s magic purse in Harry Potter!)  Now, as I tend to grab and then inspect when I get it home, I didn’t realize until I started looking at it, that there was more things wrong with it than the obvious.  Yes, I knew that there were 2 drawers and a handle that were missing, but that didn’t faze me.  I could just cut it down and make a 2 drawer nightstand instead of a 4 drawer chest…and that’s what I set out to do.

Unfortunately, one of the drawers was broken, and after much cussing and throwing of tools patiently trying to repair it using Gorilla Glue and nails, I realized that I wasn’t going to be able to fix this one.  So I sat down on the front porch and cried and screamed like a teenage girl at a Justin Bieber concert decided on Plan B.  Yes folks, even at Clif Creations, we sometimes have to have a Plan B (and C,D and E). 🙂

Plan B…cut it down to a 1 drawer piece and turn it into a small bench with storage in the bottom.

Image

Here is the piece after it has been cut and the top glued and clamped into place.

Next up I painted it with two coats of chalk paint.  When the hubs and I were at Lowe’s the other day, he bought me a $5 can of oops paint that appeared to be a really pale pink.  I decided to use it on this piece, and after two coats it looks more white than pink.  So, it’s either an optical illusion, or the rose colored glasses, that I require everyone to wear here in The Dream House of The South, are really working! 😉

Image

Because I want all of my guests to have the utmost level of comfort when they are in our home (especially in their booty area), I knew that the seat would require something plump.  So I pulled out a piece of foam that I had in the shed (it’s actually a piece of our old Memory Foam bed), and got to work.

I have found that the easiest thing to use to cut foam of any thickness is…a Black & Decker electric meat knife!

And now a word from our sponsors:

“Black & Decker electric meat knives…not just for cutting meat, anymore!”

We now return you to your regularly schedule blog post:

That’s right kids, an electric meat knife will cut through that foam like butter…meat, butter…I’m hungry all of a sudden…I wonder what the hubs is making for dinner…

Oh wait, where was I?  Oh yes, the foam seat.  I measured the top of the bench and then cut the foam to that size.  Then I got to work making a removable slipcover out of a pink and white ticking fabric. (I don’t do tutorials on sewing, as it is too hard for me to explain with photos, but there are numerous tutorials on the net.)

Image

What do you think?  I wanted the seat cushion to be extra thick so that it would be more comfortable.

Image

The ticking fabric is really versatile too, and will go with just about anything.  Cause everyone knows that at The Dream House of The South, we LOVE pink!  Well, at least I love it…the hubs just tolerates it. 🙂

Keep creating!

Clif

The French Dresser That Almost Wasn’t

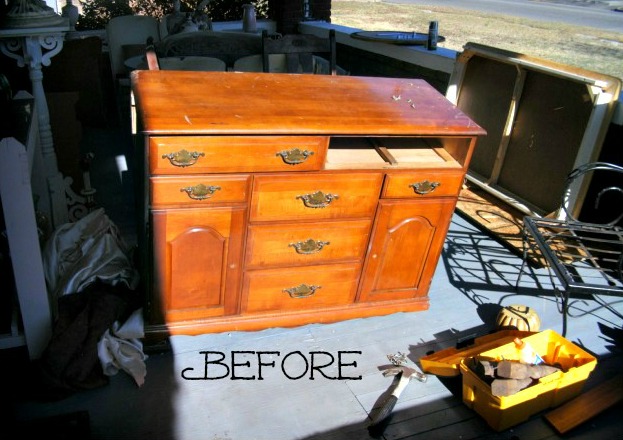
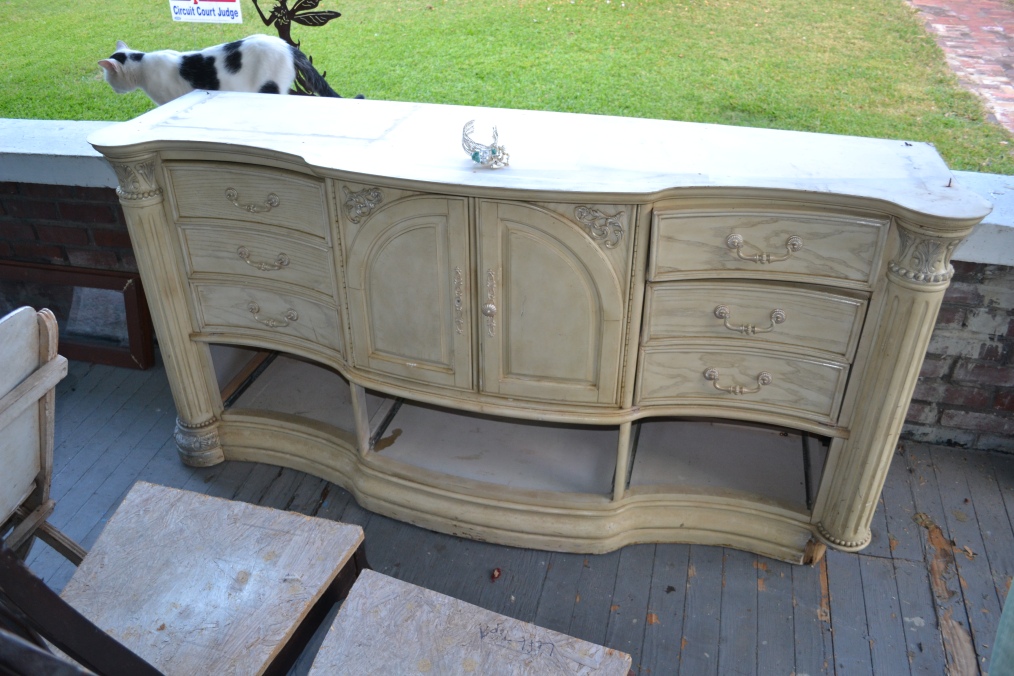
Sometimes in my junking, I come across a piece that is fabulous, but is too big or too heavy to fit in my Honda Civic.  This dresser was just such a find.  (Our cat, Henry, is checking it out.  He thought it was a piece of crap…but what do cats know?!)

Image

I started to leave it where I found it, but I was hypnotized by those curves.  I went on to work thinking that this one was not meant to be.  Later in the day though, I got to thinking about it again, and then I thought about my best friend, Greg…he has a pick-up truck.

Image

So I called him and asked if he would help me get the thing home.  And, being the wonderful friend that he is, he said, “Hell NO!” “Of course I will help you.”  So off we went to get it.  Afterwards, the hubs and I treated him to dinner at our house.

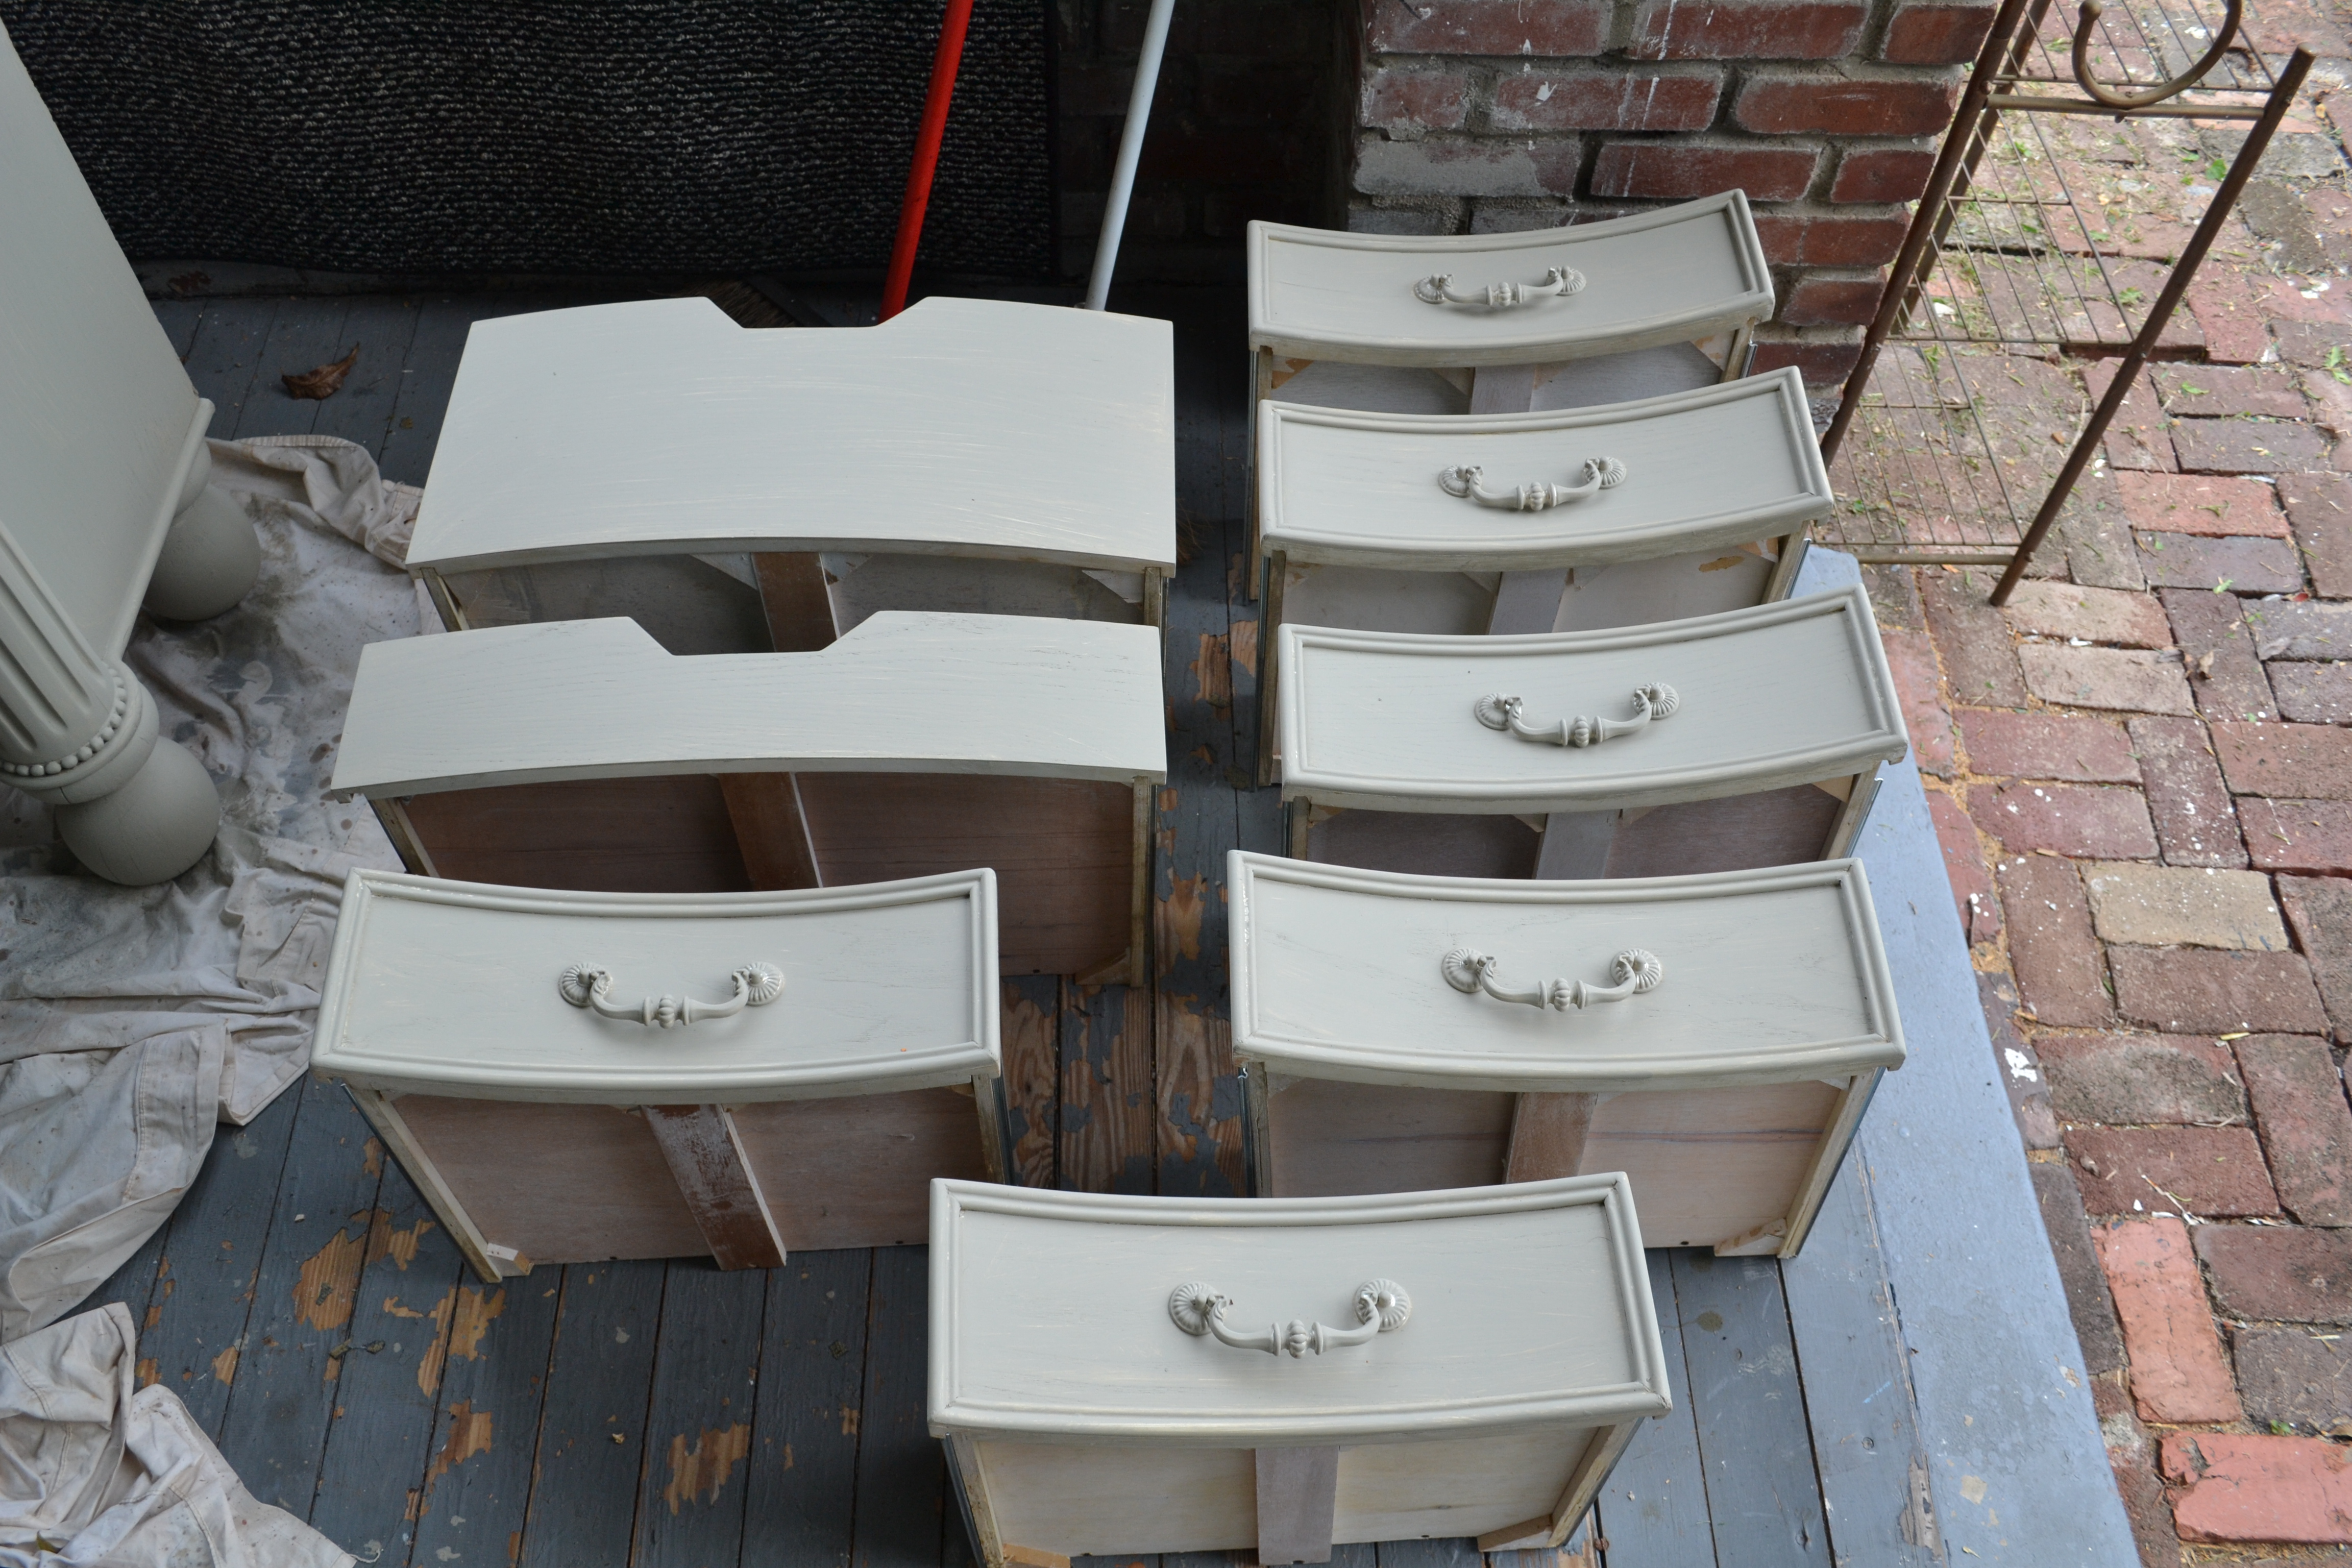
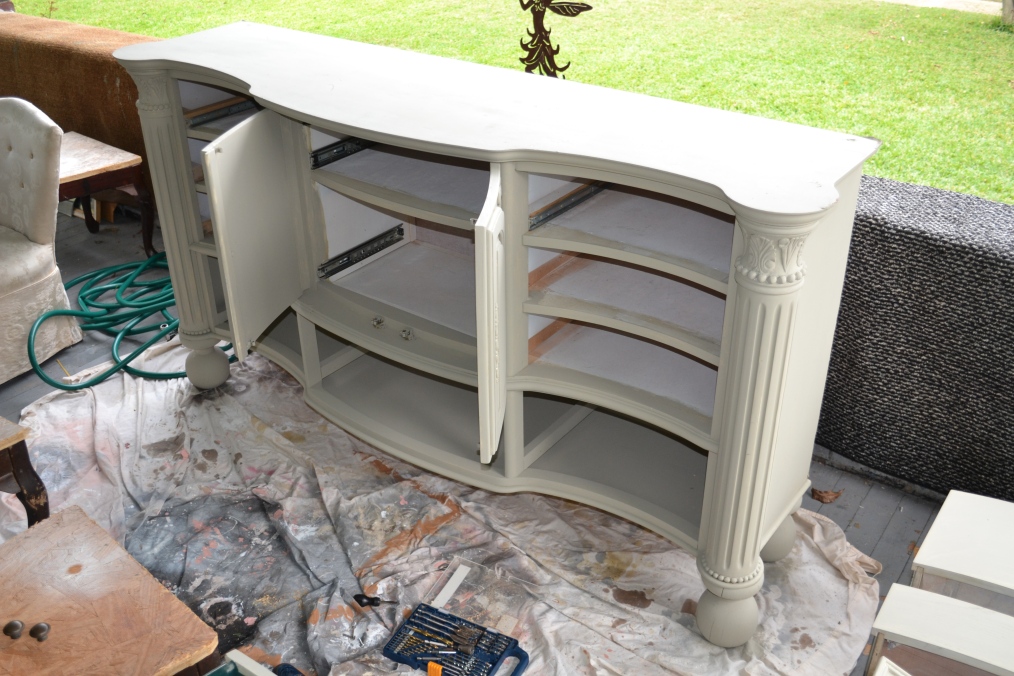
As you see in the photo above, the dresser was one of my usual finds.  Missing pieces (bottom drawers), broken parts (the base and one of the feet), and in desperate need of a makeover.

Once we got it on the porch, and I got a good look at it, I realized that the top was made of that wonderful French product, panneau d’aggloméré, panneau composé de bois reconstitué, which is known in the US as cheap ass particle board.  Shoot!  All that trouble to haul this behemoth to our house and it’s made out of that crap!

I started to throw in the towel at this point…but oh, those curves!  So, I decided I would work with it.

The next thing that I had to address was the broken base and missing foot.  I took off the decorative curved piece and the one remaining foot, and then realized that the piece would not look good sitting right on the floor.  So I improvised by adding four wooden finials that I found last year and that were just chunky enough to blend with the rest of the dresser.

Image

As it looked kind of French to me, oh, those curves, (and because it was made with panneau d’aggloméré, panneau composé de bois reconstitué) and as I still have a crap load of am in love with the color French Linen, I decided to paint it with two coats of that color of chalk paint.

Image

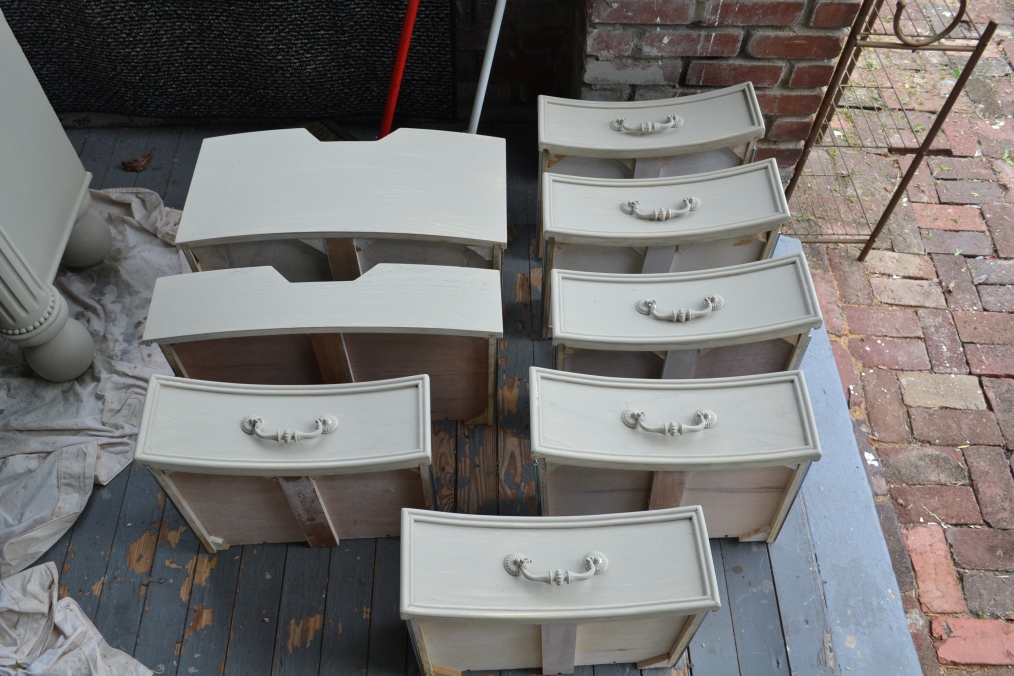
If you are good with math, you will see that there are fewer drawers than openings in the dresser.  I have had this dilemma before, and I want to know, what happens to the damn drawers when people throw out furniture?  Do they simply lose them on the way to the alley?

I decided that I work with this design flaw (oh, but those curves) and embrace it.  I would find baskets that would fit into the openings and that could be used to hold linens or such.  Easy right?  Ha!  Sure, it was easy, as easy as 1,2,3.  ONE week later, I found them at TWO different Homegoods stores, which took a total of THREE trips to locate matching sets.  I came close to throwing in the towel again…but oh, those curves!  So I pressed on.

Now many of you know that I don’t like things that have that brand new look to them. I like things that are aged and distressed like me like furniture one would see in a high end catalog.  So I decided to give the dresser a finish using a wash technique.

For those of you that don’t know what a wash is, do you remember the trend back in the 80s, when a lot of the furniture (especially in the country style) was given a pickled look?  Well, a wash is like that…only sexier!  And as you know, at Clif Creations, we are all about the sexy!

I had done a wash before on a chair that I had refinished, and I had really liked the effect.

Image

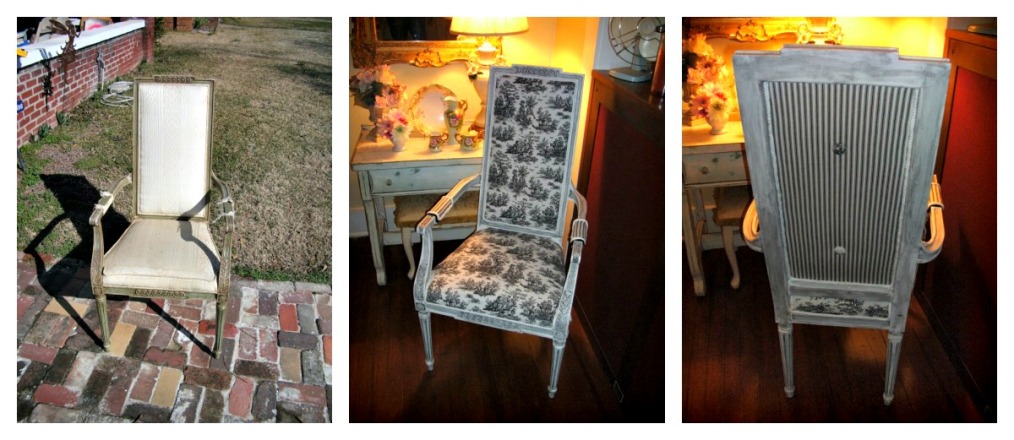
That was a black wash over Old White.  This time I would do a white wash over French Linen.

Image

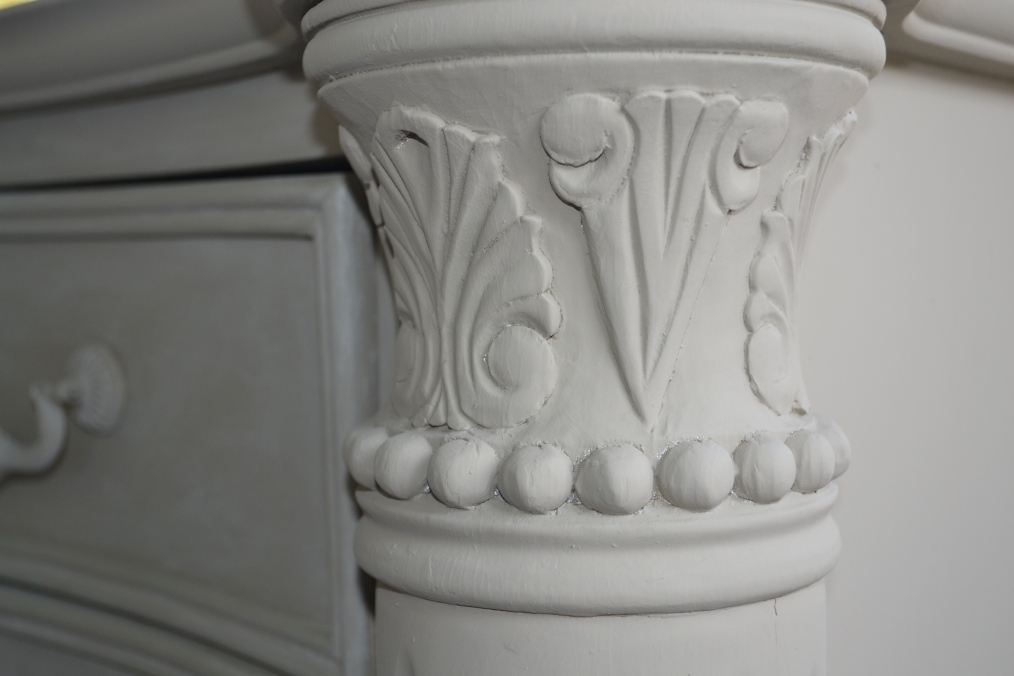
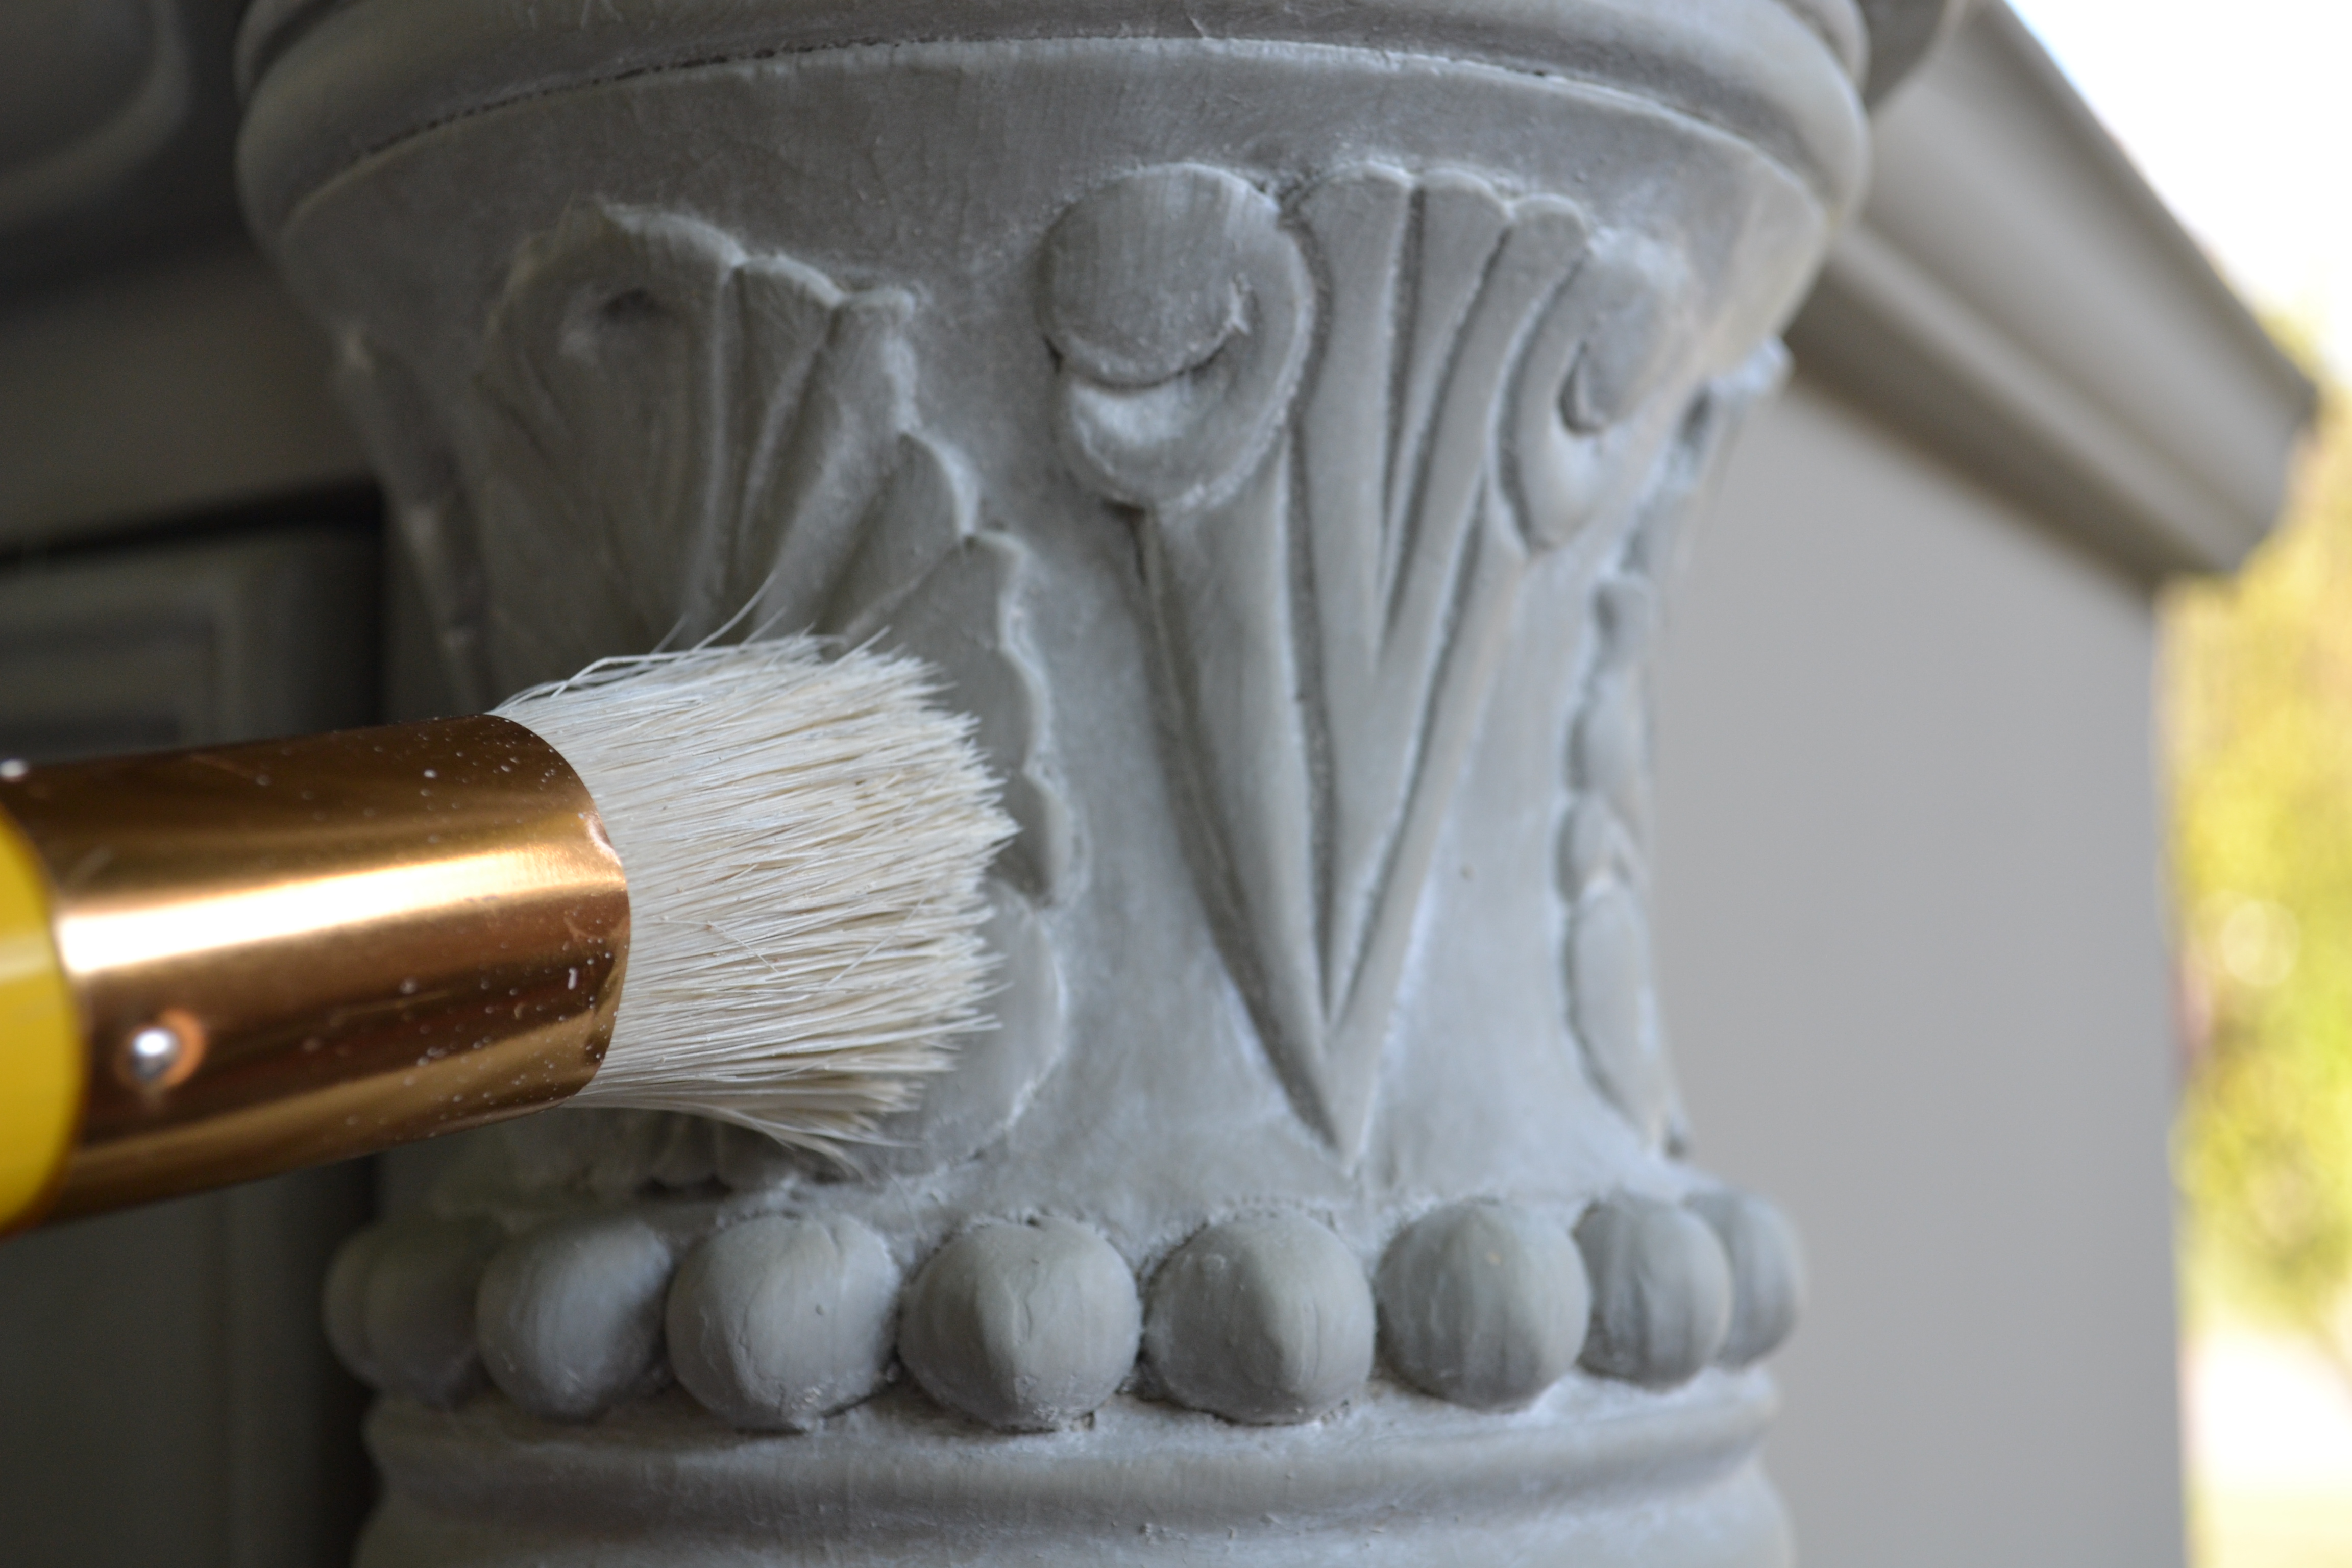
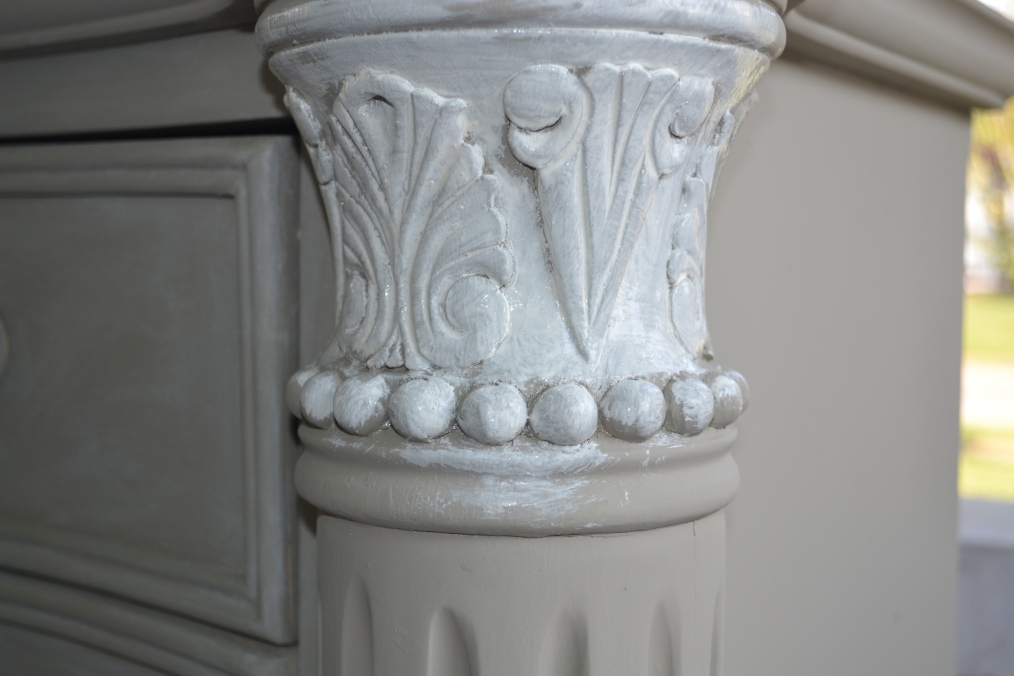
This is a close up of the piece with two coats of French Linen and before the wash.  A wash is simply paint that has been thinned out with a little bit of water.  You want it to have a really runny consistency.

Image

I dip the stencil brush in the wash and then paint it onto the piece.

Image

I work in small areas, brushing on the paint.  Then I take a soft cloth and either wipe off most of the paint, or lightly tap the paint with the cloth, depending the desired look.

Image

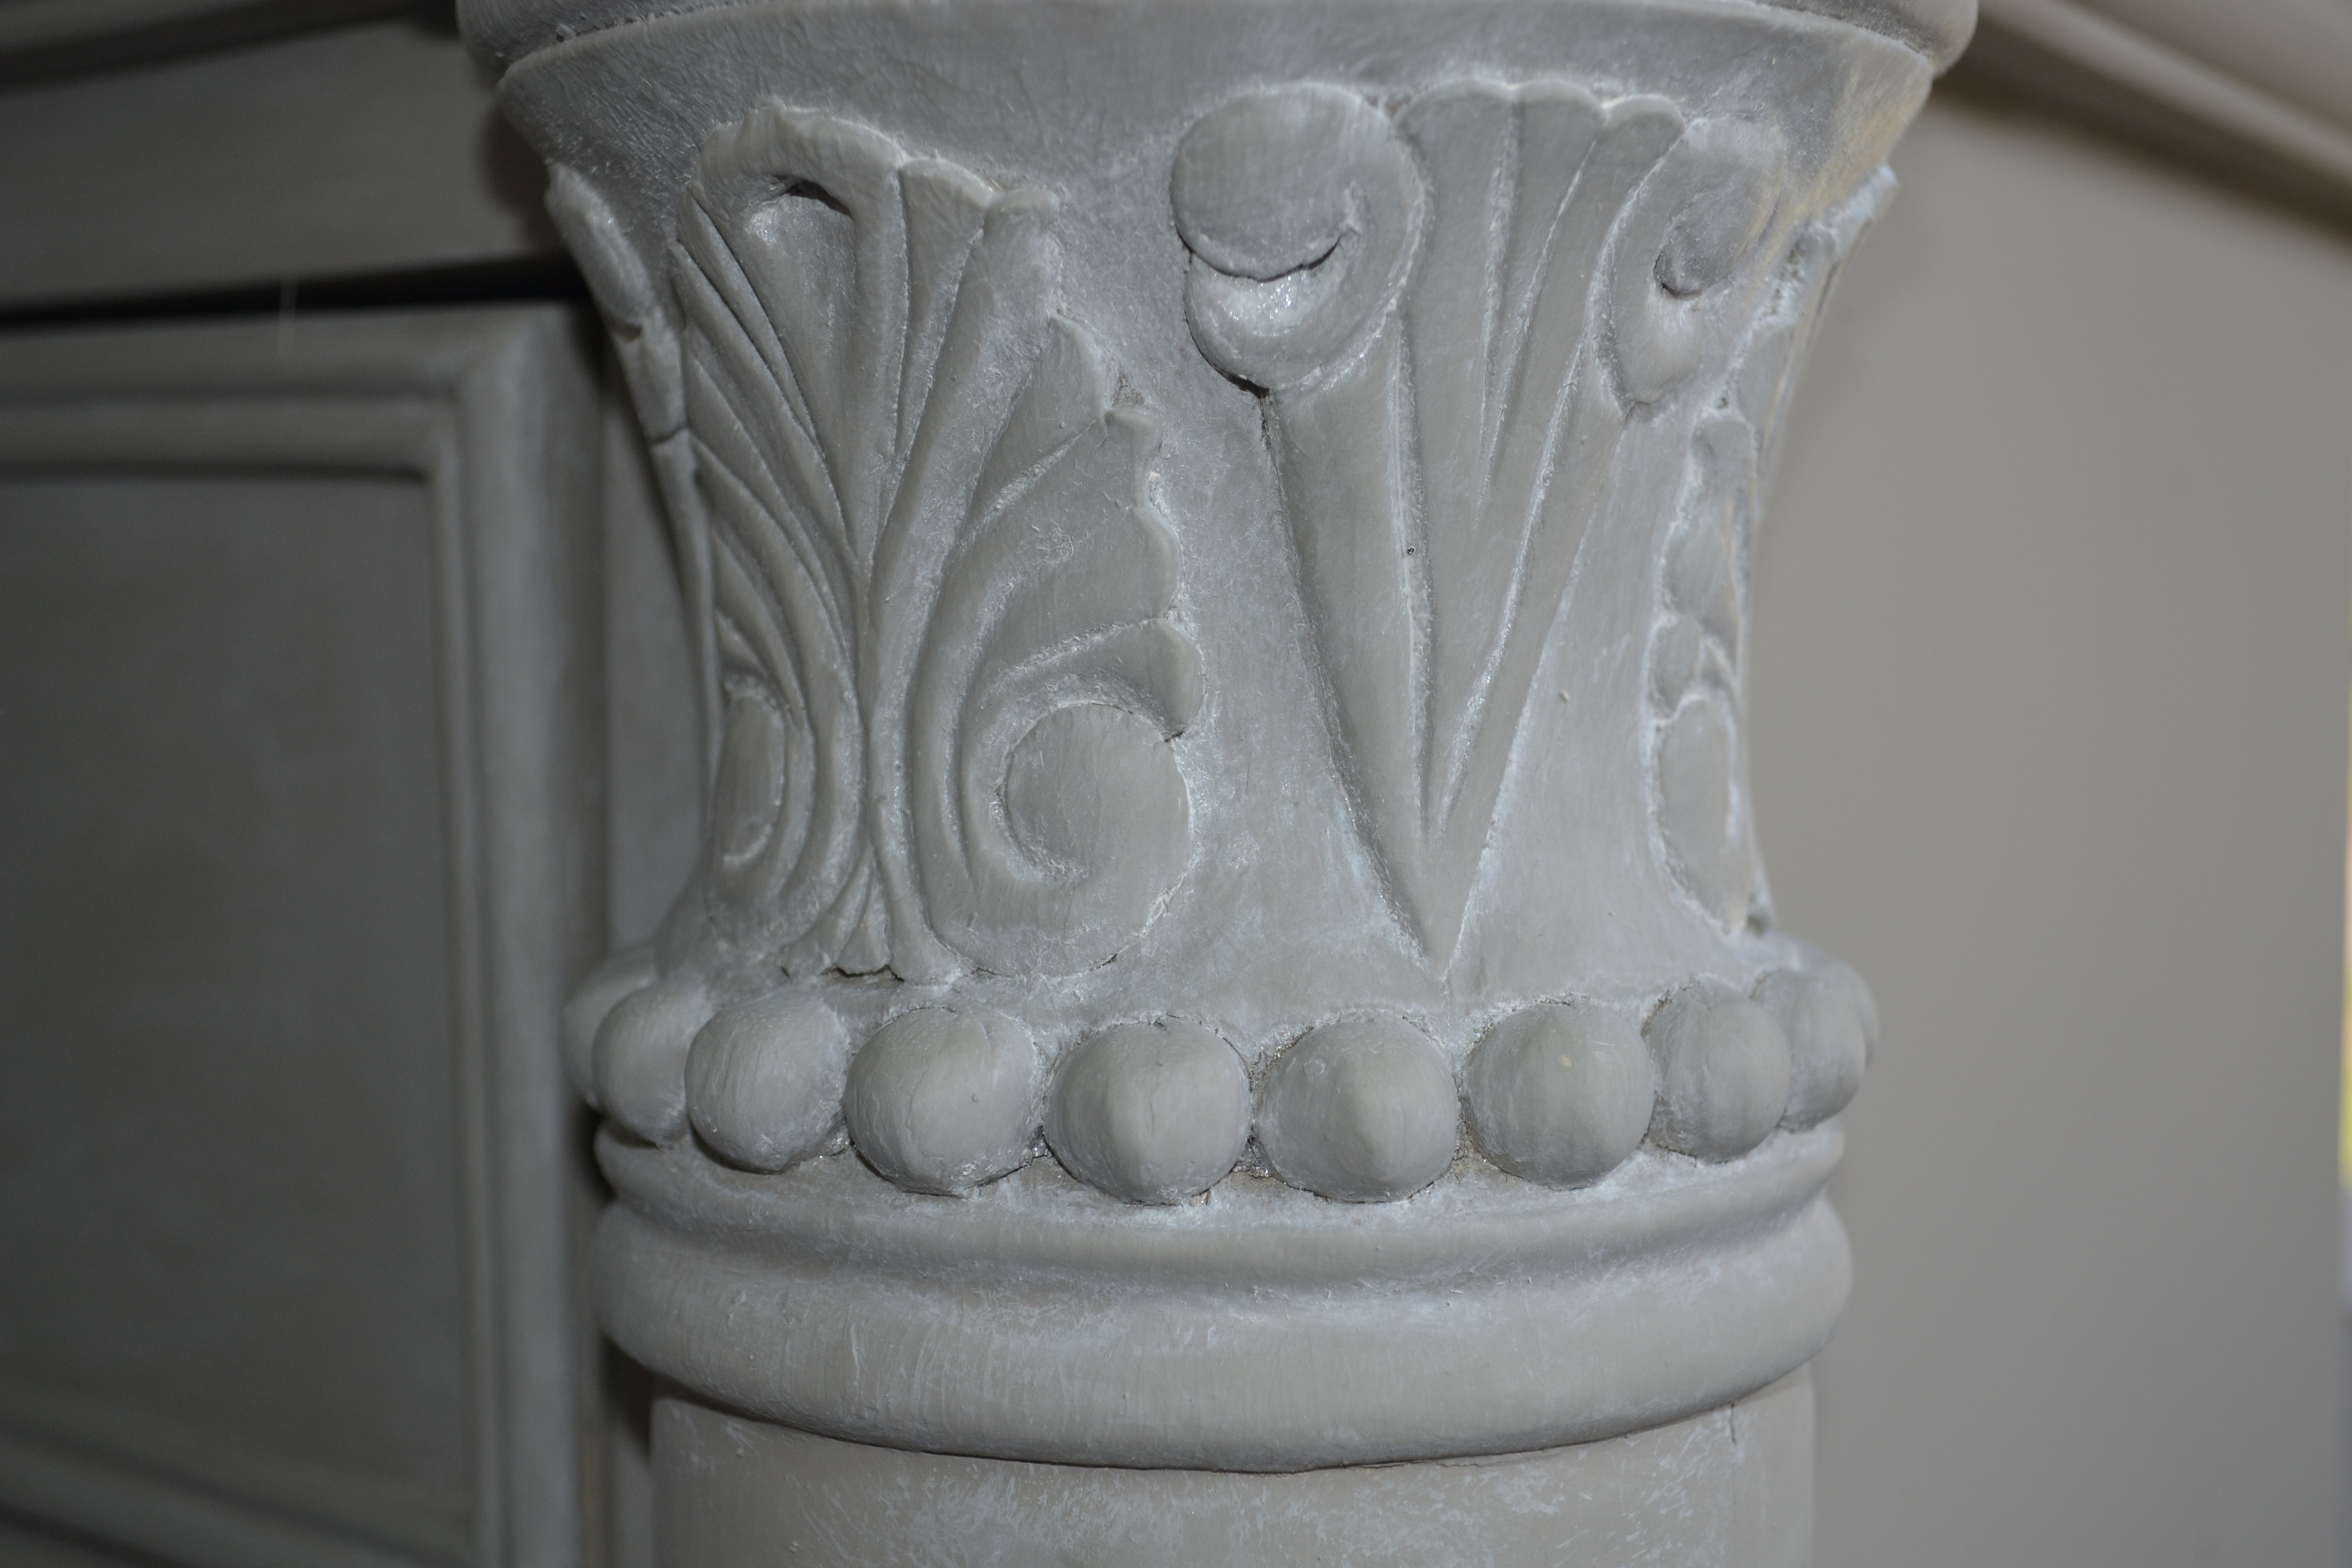
And then you are left with this.  It softens the color of the base paint and brings out the details of the carved areas.

Image

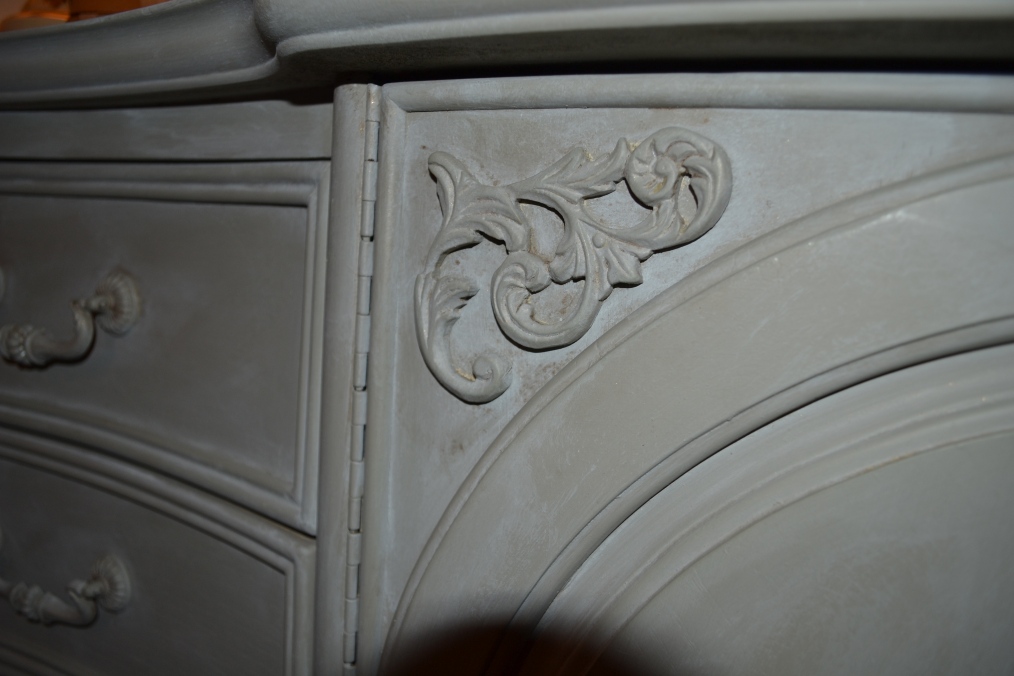
I also gave this piece a brown wash to age it even more. (Sorry for the dark photo, but I didn’t have a lot of natural light at this point in the day.)

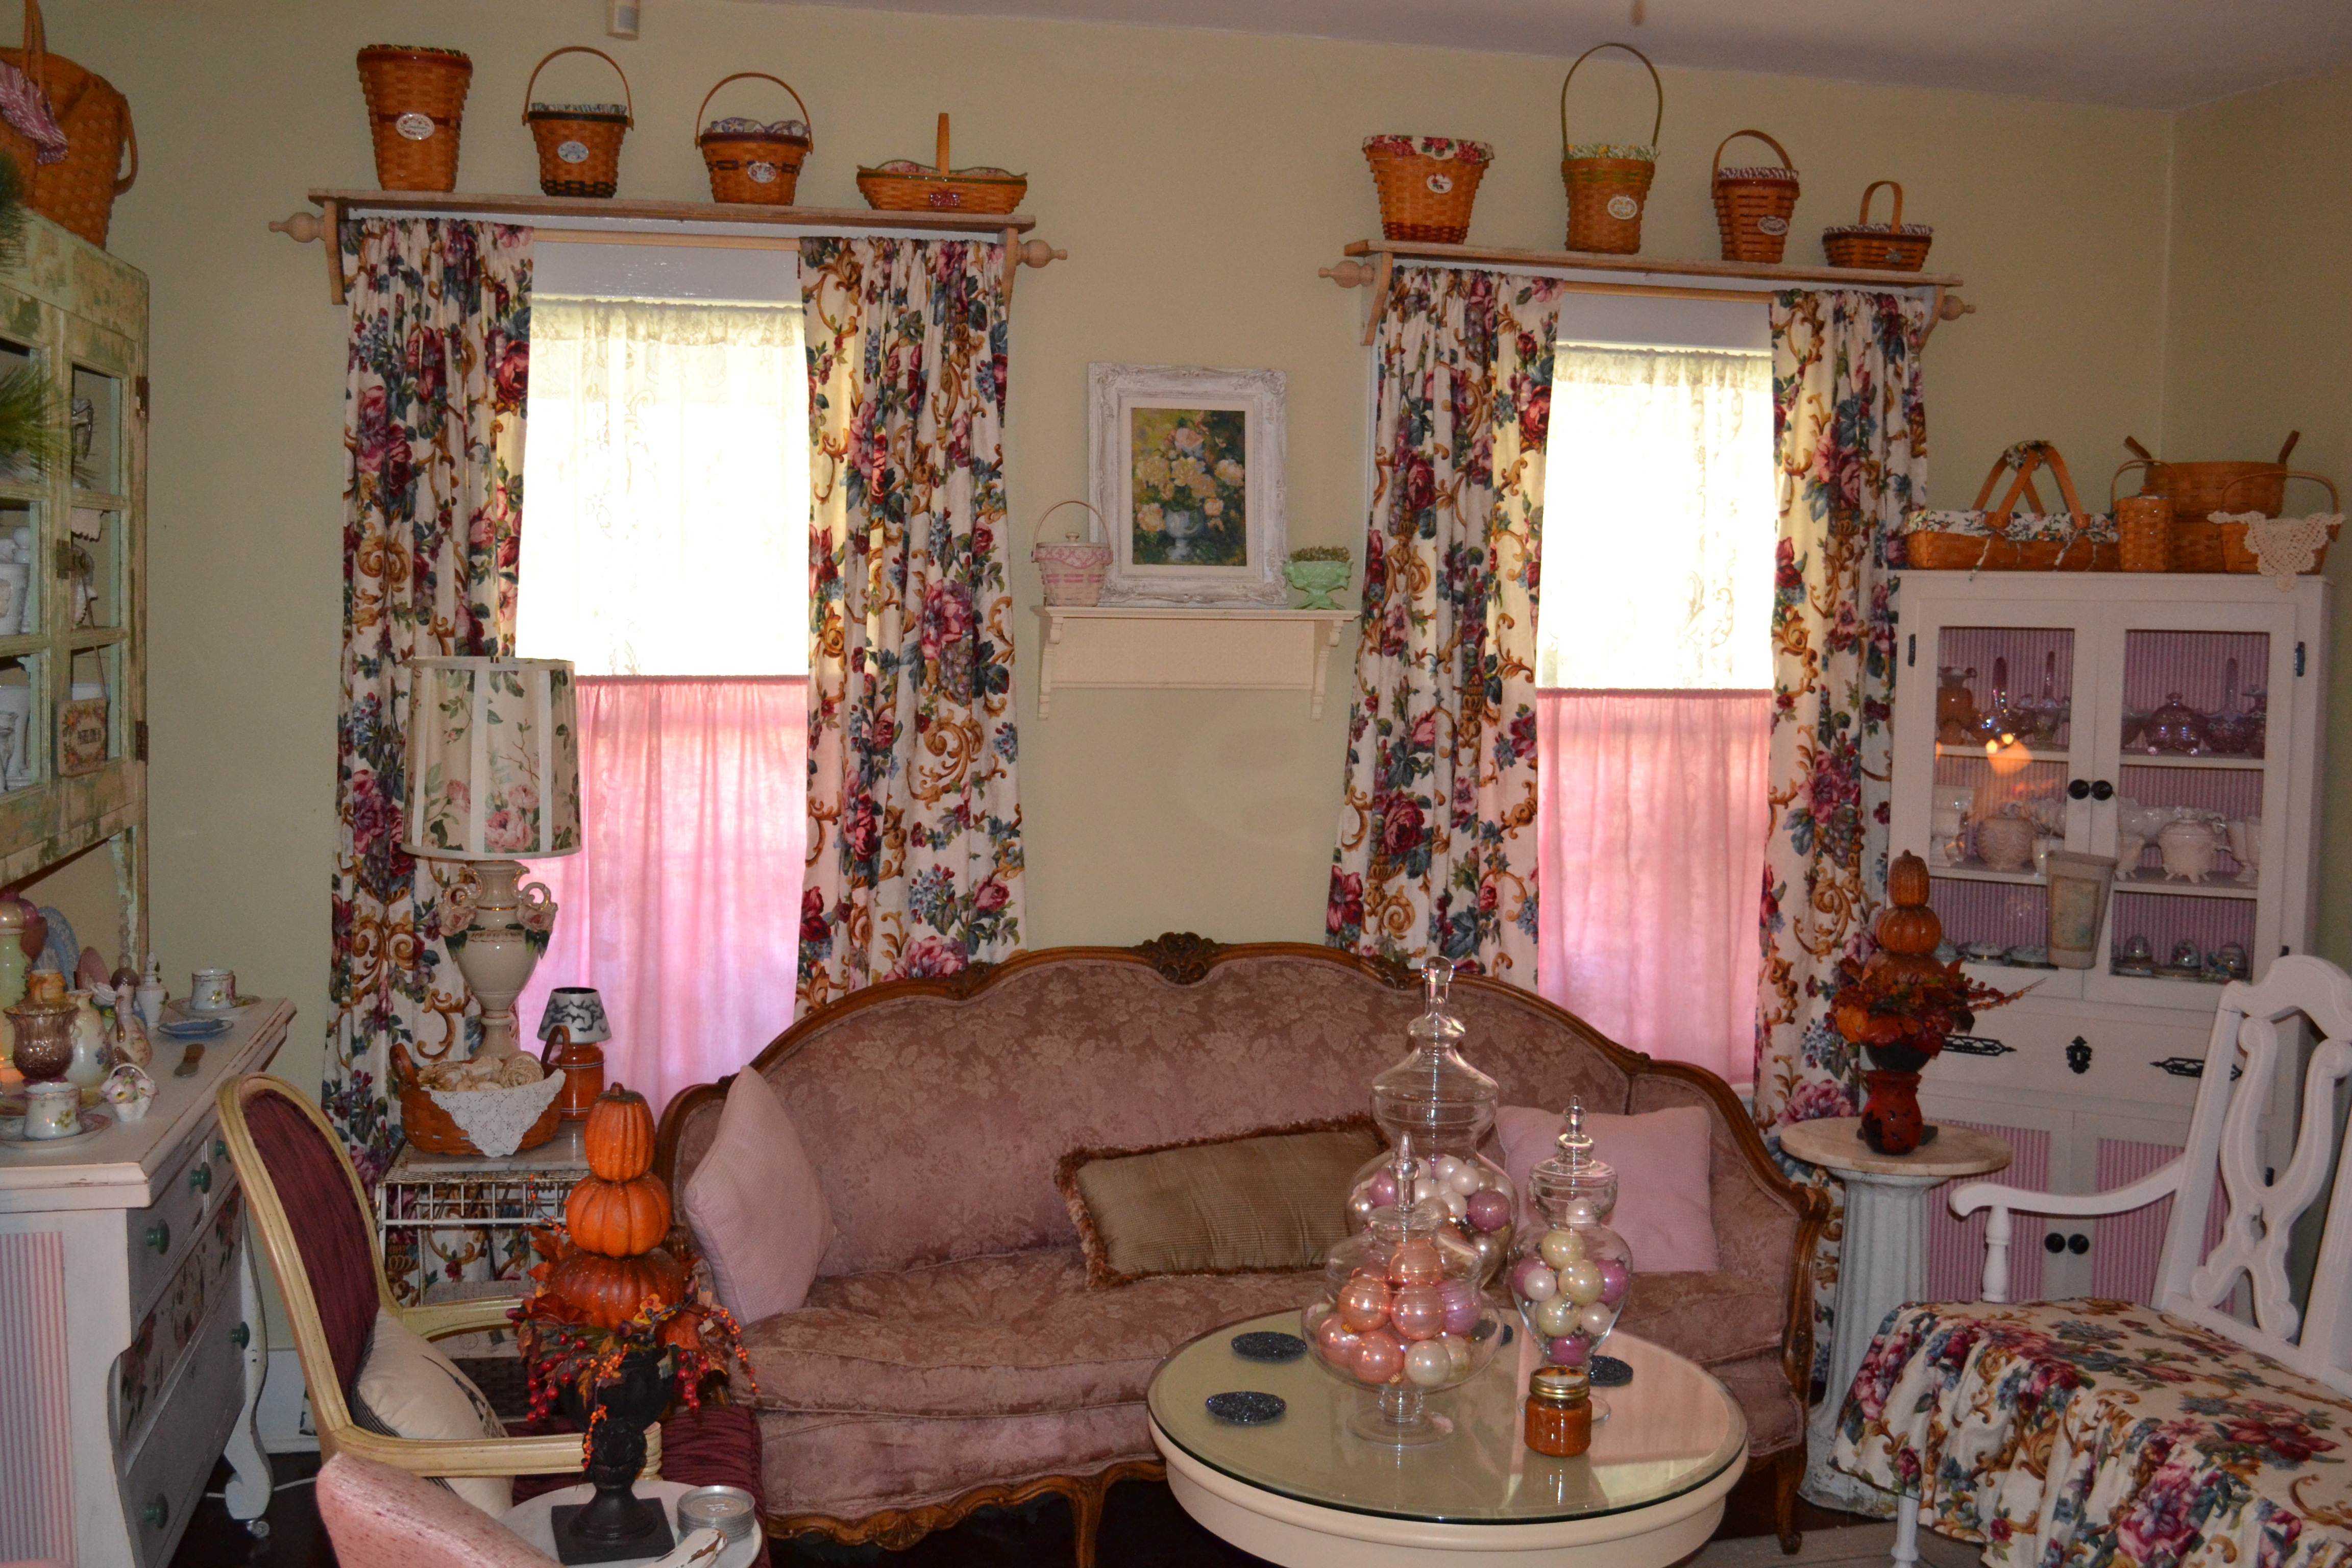
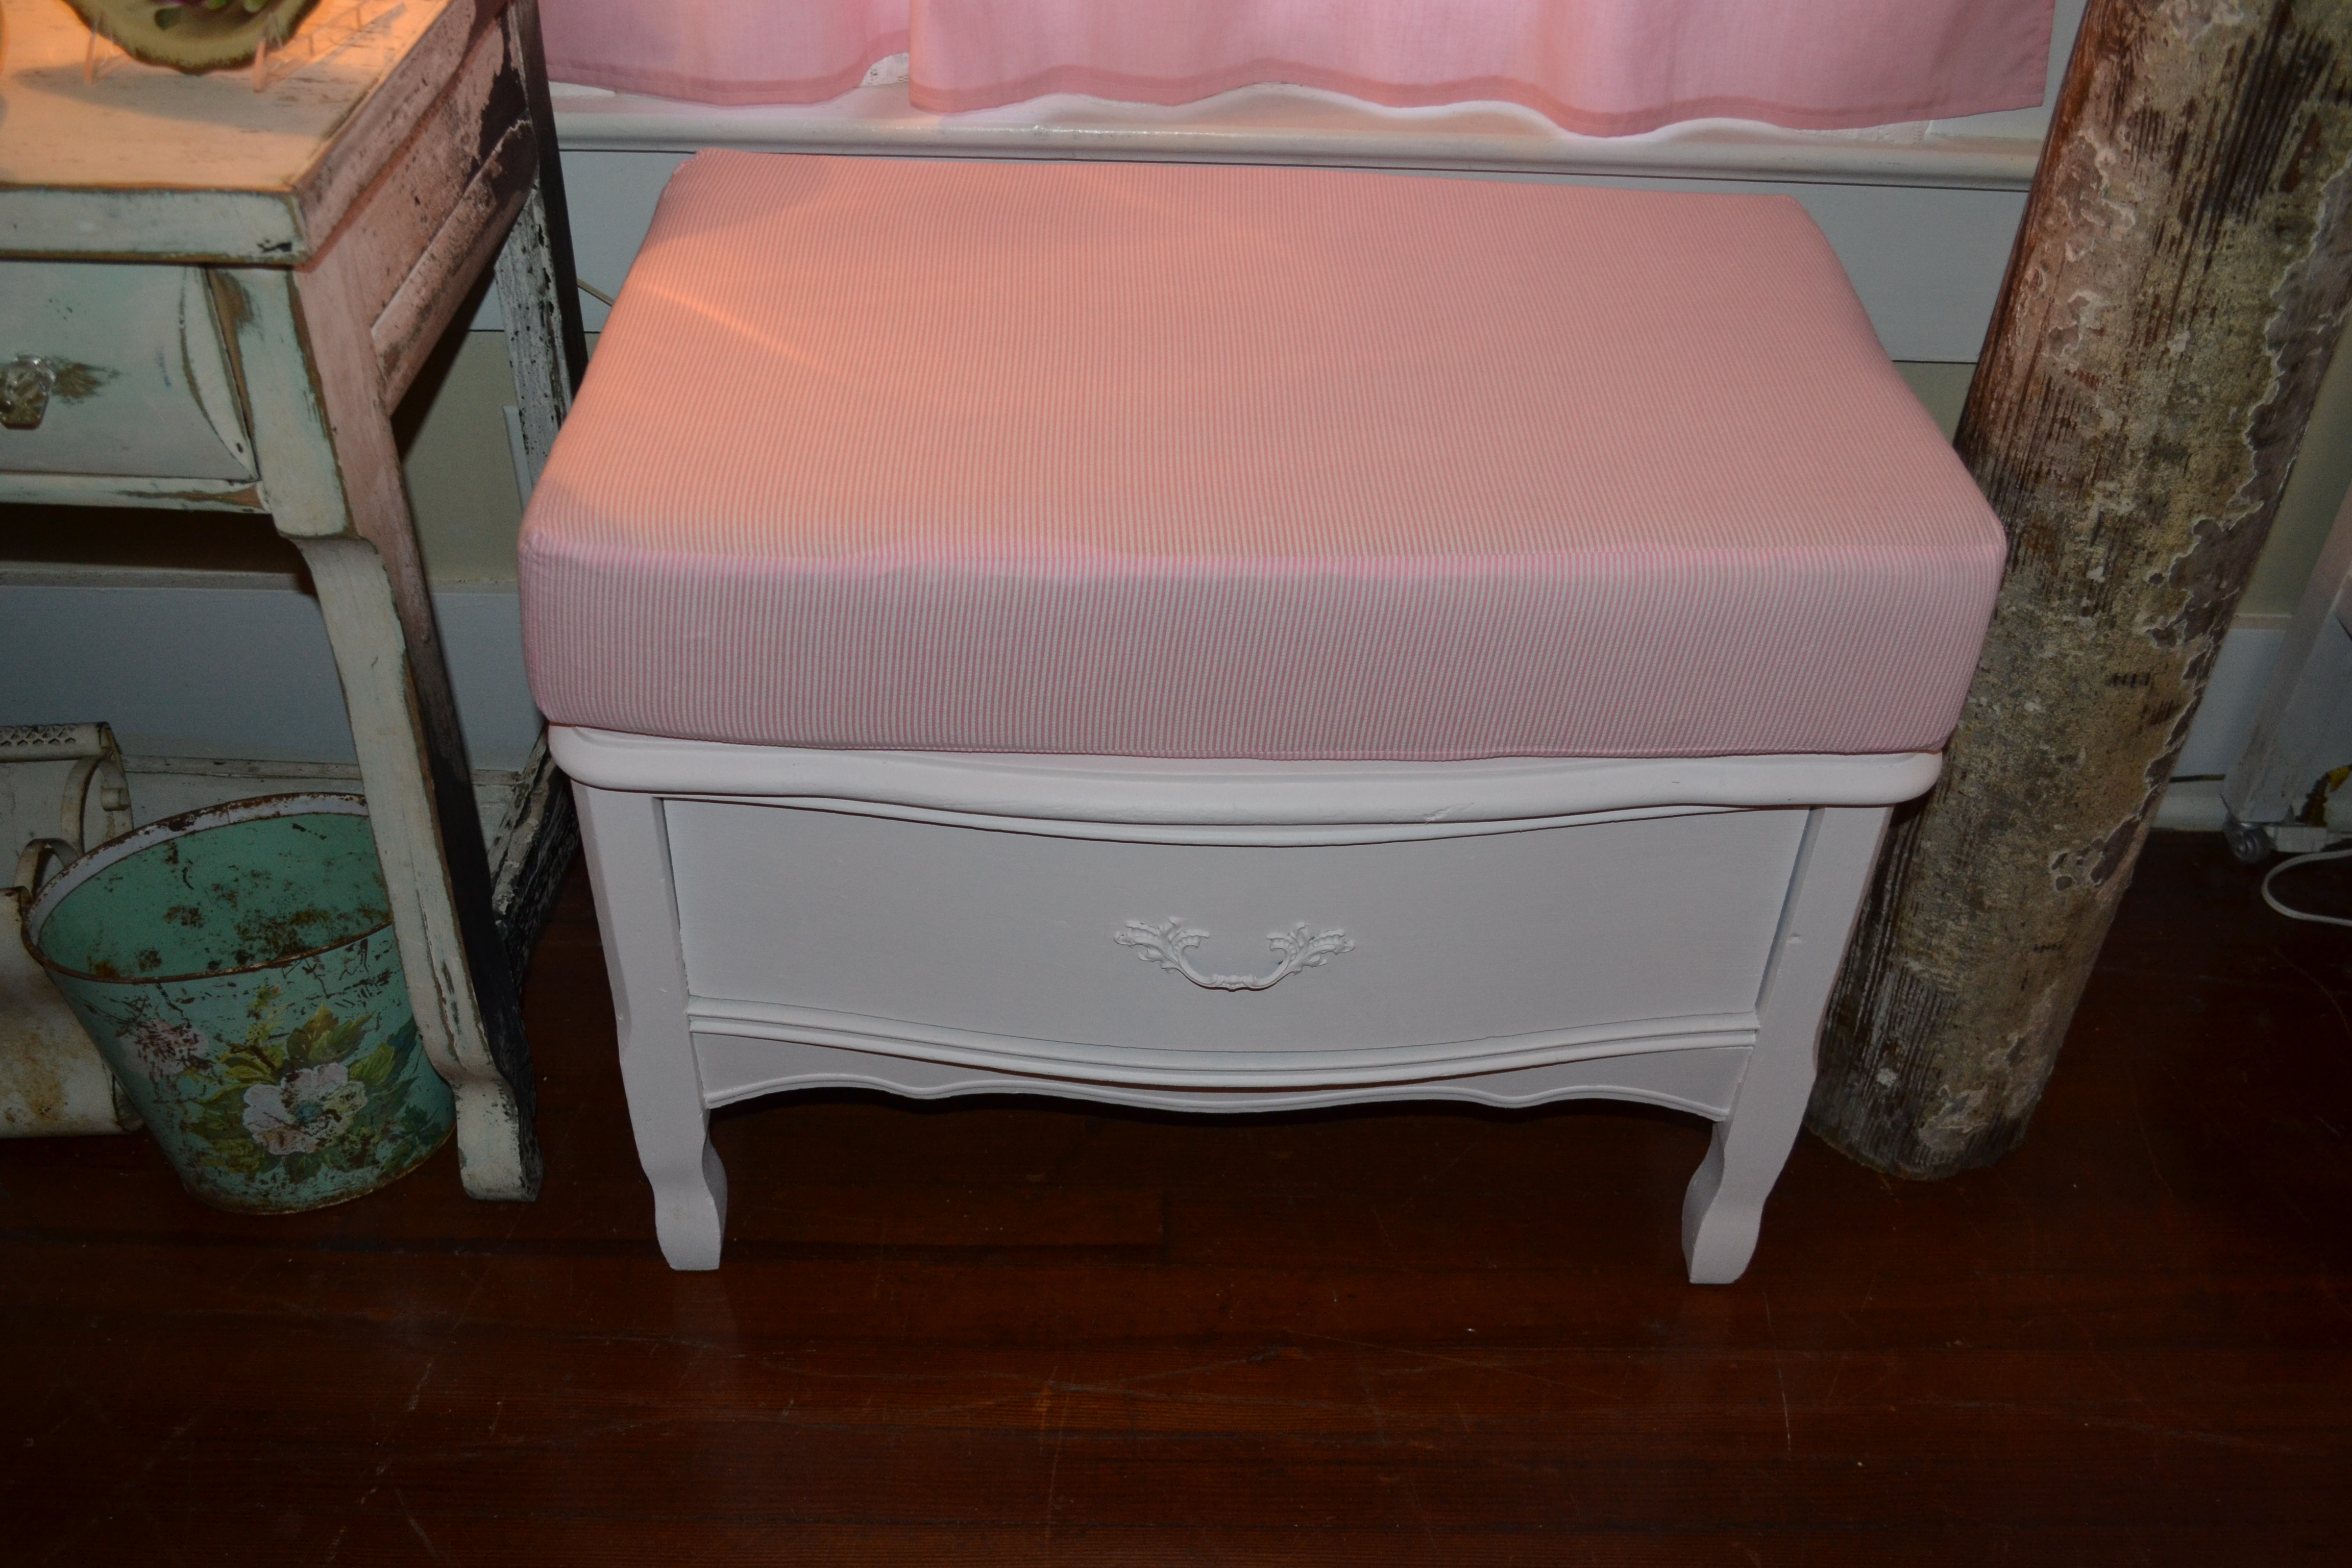
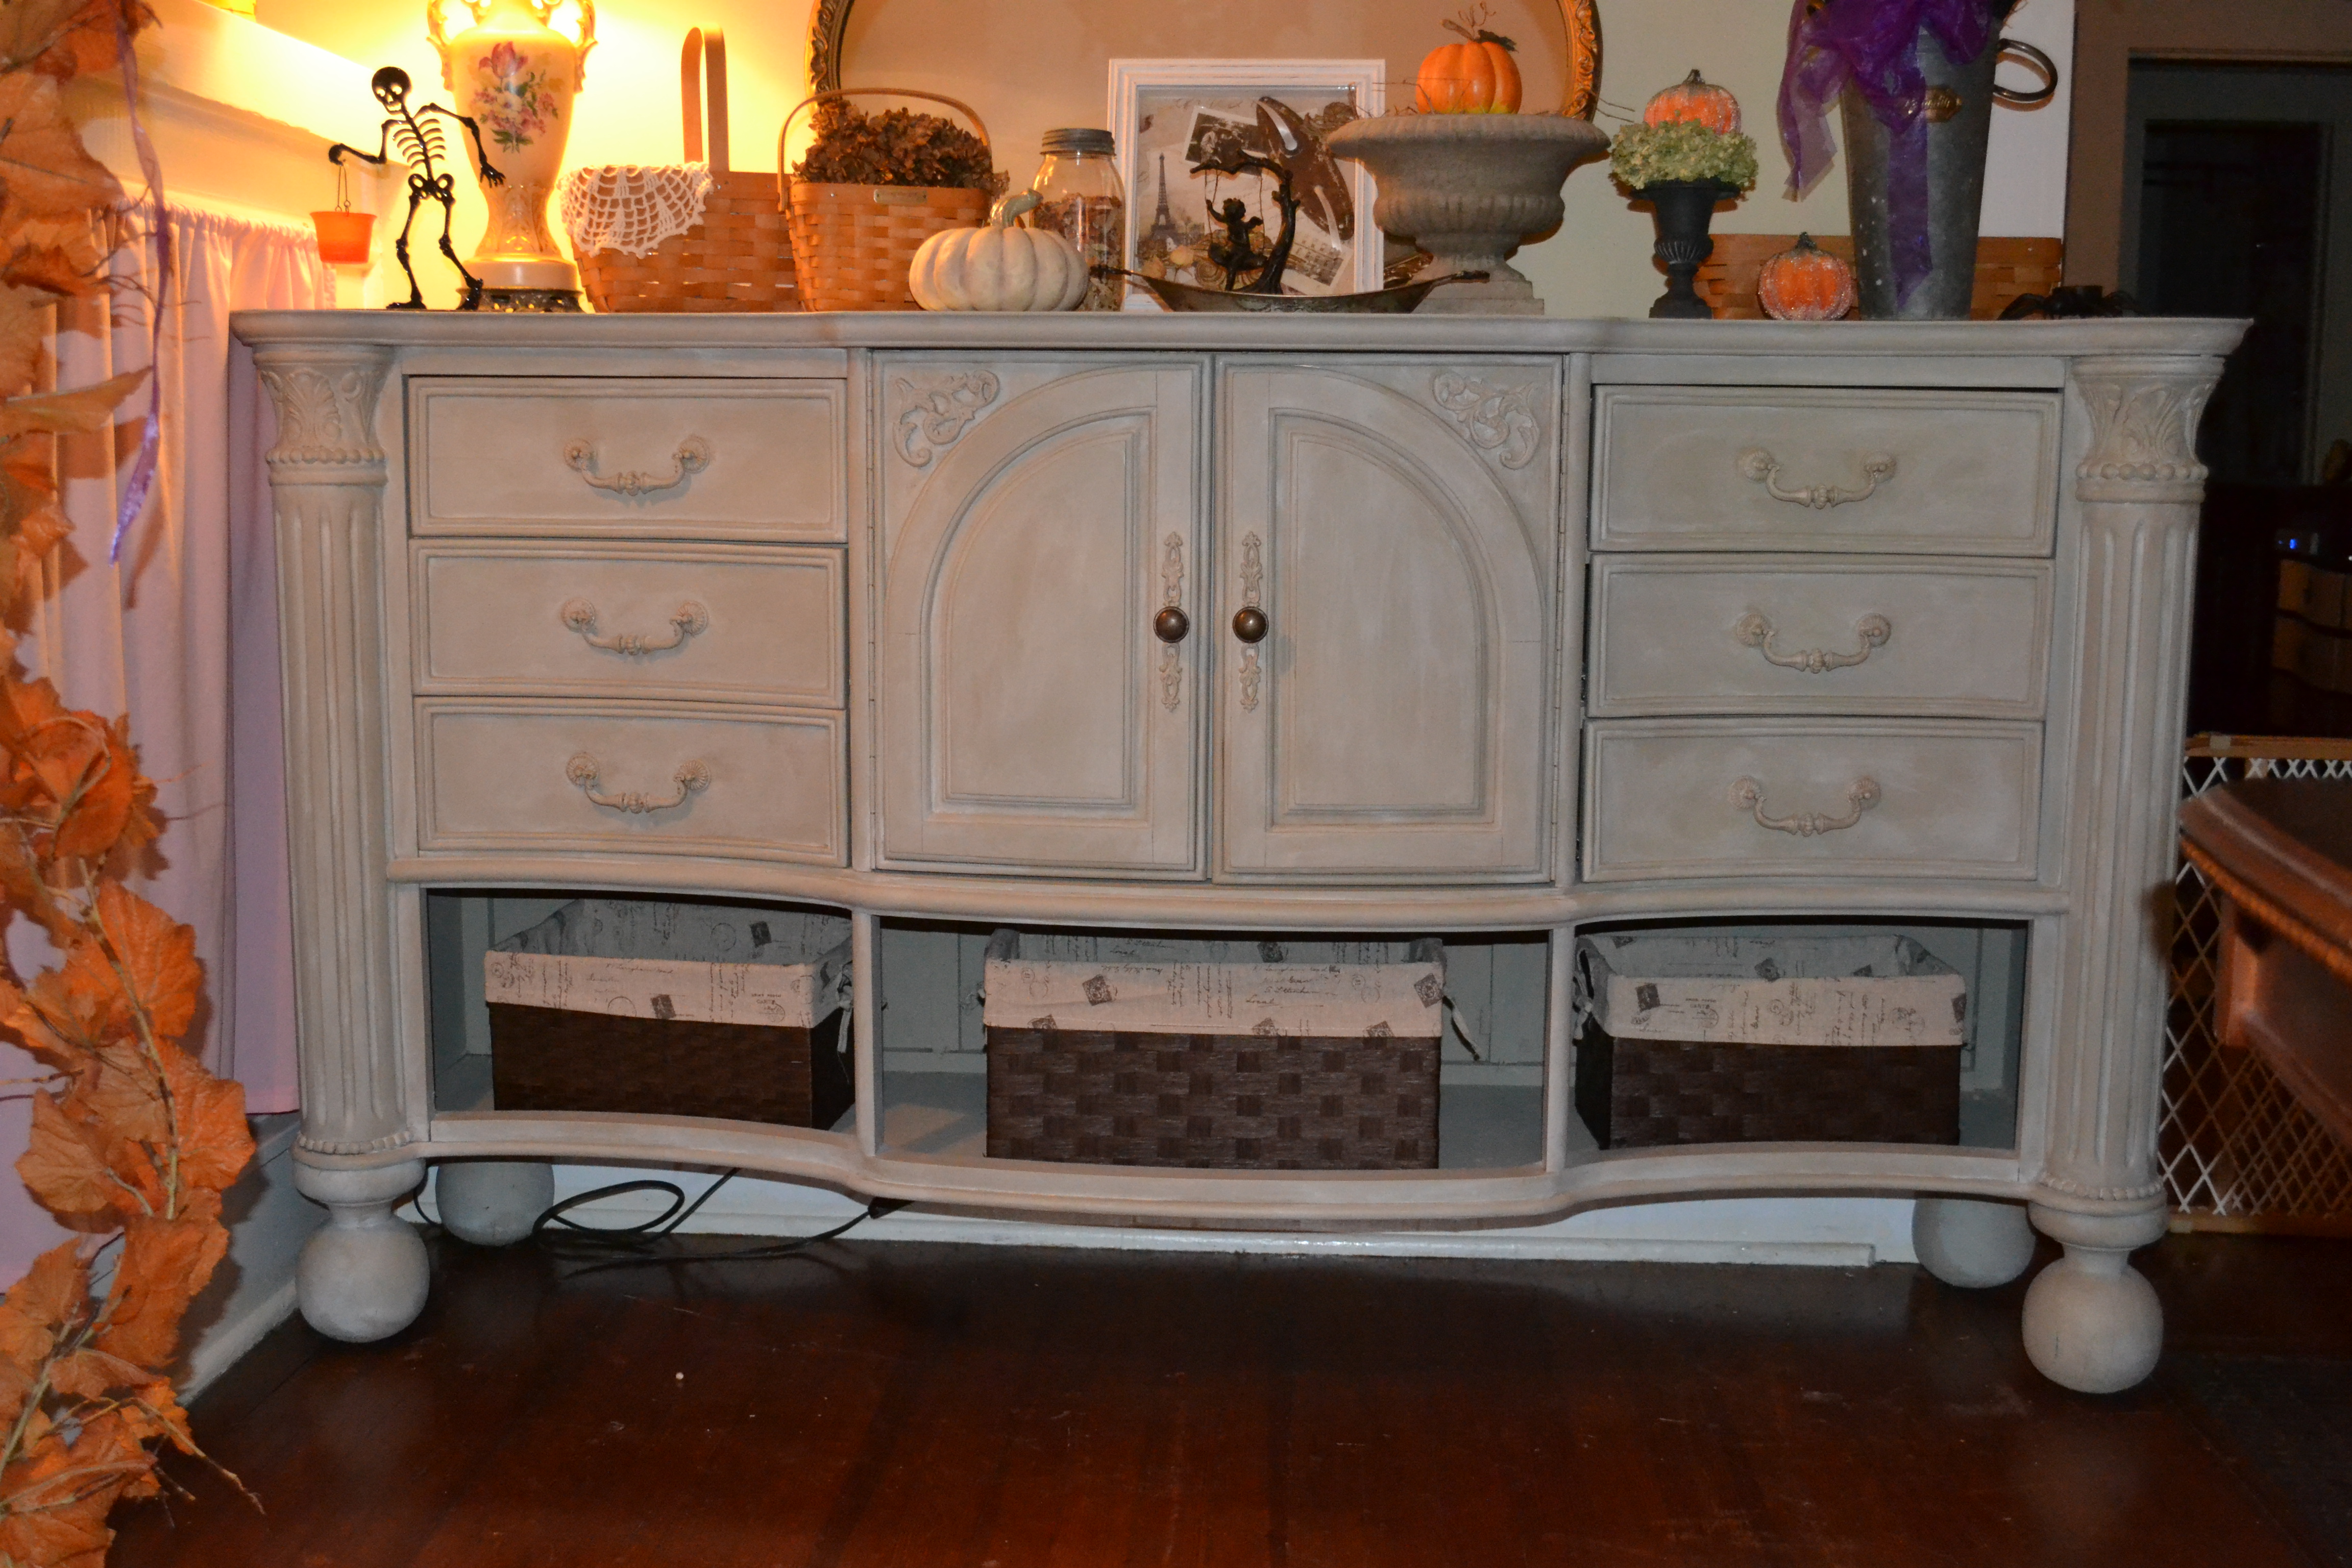
And after all is said and done, we have a fabulous new buffet for our dining room.

Image

The baskets are a brown woven material (made of recycled materials) with a linen liner that has French script and postage stamps on it.  They fit perfectly in the space and give it that finished look.

Now, I know what you are thinking, “Didn’t you recently do another dresser buffet for your dining room?”  Yes, but this is more in the style that I am going for, and the other piece is now in our den.  Plus this one, like the other one, was free…so don’t judge! 🙂

Keep creating!

Clif